
How can we highlight the elements in use with Selenium WebDriver?

A reader asked for recommendations on how to use Selenium to make the elements in use visible.
Note: The earlier version of Selenium had a “Highlight” command. This blog post was originally written on 20100630 describing how to use that. The post has been updated in 2020 for Selenium WebDriver.
The Question
Selenium-RC had highlight which flashed the control yellow. A small helper function help debugging so people could see some indication of what elements your script touches.
I can see why you might want to to highlight the locator elements in use at the time and error happens, if you take screenshots automatically when a test fails.
And now, with the notion of “Observability”, we might consider, how can I make my automated execution visible to an external observer.
An Approach
I would start by first creating a simple class which can highlight elements.
- Given a driver and a desired background colour
public class HighlightElement {
    private final WebDriver driver;
    private final String backgroundColour;
    WebElement lastElement;
    String lastElementOrigColour;


    public HighlightElement(final WebDriver driver,
                            final String backgroundColour) {
        this.driver = driver;
        this.backgroundColour = backgroundColour;
    }
- have a method which can highlight a given element
- it also remembers which element we last added a highlight to, so that we don’t litter the page with highlighted elements
- I’m using a very simple approach of changing the background colour of the elements.
    public WebElement highlight(WebElement newElement){

        // turn off last element
        if(lastElement!=null){
            setBackgroundColourOfElement(lastElement,
                    driver, this.lastElementOrigColour);
        }

        lastElement = newElement;

        if(newElement!=null){

            this.lastElementOrigColour =
                        newElement.getCssValue("backgroundColor");

            setBackgroundColourOfElement(newElement, driver,
                                         backgroundColour);
        }

        return newElement;
    }
- the actual work of setting the background colour is done by a simple JavaScript script
- Casting the
drivertoJavascriptExecutorallows running the script to change the background colour of the element - catch any errors just in case something goes wrong
    private void setBackgroundColourOfElement(final WebElement element,
                                              WebDriver driver,
                                              final String desiredColour) {

        try {

            ((JavascriptExecutor) driver).executeScript(
                    "arguments[0].style.backgroundColor=arguments[1]",
                            element, desiredColour);

        }catch(Exception e){
            if(e instanceof StaleElementReferenceException){
                // ignore
            }else {
                System.out.println("Error setting background colour of element");
                e.printStackTrace();
            }
        }
    }
}
And this could then be used in a test:
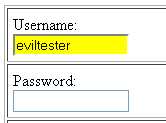
driver.get("https://testpages.eviltester.com/pages/forms/html-form/");

highlighter.highlight(
        driver.findElement(By.name("username"))
    ).sendKeys("Bob");
This would allow adhoc highlighting if needed.
What if highlighting was always on?
To make highlighting always on, I would want to do that at a driver level and could use an EventFiringWebDriver with a listener which trapped:
Some interaction events:
beforeClickOnbeforeChangeValueOf
And the ‘find’ event:
afterFindBy
And this would basically delgate off to the HighlightElement class we created earlier.
public class ElementHighlighter implements WrapsDriver {
    EventFiringWebDriver driver;

    public ElementHighlighter(final WebDriver aDriver,
                              final String desiredBackgroundColour) {

        driver = new EventFiringWebDriver(aDriver);
        driver.register(new ElementHighlighterListener(
                                    driver, desiredBackgroundColour));
    }

    @Override
    public WebDriver getWrappedDriver() {
        return driver;
    }

    private class ElementHighlighterListener extends
                             AbstractWebDriverEventListener {

        HighlightElement highlighter;

        public ElementHighlighterListener(WebDriver driver,
                                          final String highlightColour) {

            highlighter = new HighlightElement(driver, highlightColour);
        }

        @Override
        public void beforeClickOn(final WebElement element,
                                final WebDriver driver) {

            highlighter.highlight(element);
            super.beforeClickOn(element, driver);
        }

        @Override
        public void beforeChangeValueOf(final WebElement element,
                                        final WebDriver driver,
                                        final CharSequence[] keysToSend) {

            highlighter.highlight(element);
            super.beforeChangeValueOf(element, driver, keysToSend);
        }

        @Override
        public void afterFindBy(final By by, final WebElement element,
                                final WebDriver driver) {

            highlighter.highlight(element);
            super.afterFindBy(by, element, driver);
        }
    }
}
Full Source
The full source for this is in my Webdriver Java FAQs project:
Specifically:
If you want to learn how to use Selenium WebDriver with Java then check out our online courses.